One of the most common tasks in the development of mobile applications is the consumption of web services. There are several tools that simplify this task, and the most popular for Swift is Alamofire.
Alamofire simplifies a number of common networking tasks, it makes development faster and easier.
If you are ready to become a professional iOS developer, you must follow this guide.
Why Alamofire
Alamofire is an HTTP networking library written in Swift.
Alamofire helped me to improve the quality of my code. It taught me a simpler way to consume REST services.
Alamofire is the basic tool for hundreds of projects.
Before You Start
Here are the requirements to install Alamofire,
Your development target must be,
- iOS 8.0+
- macOS 10.10+
- tvOS 9.0+
- watchOS 2.0+
Then, you’ll need to install,
- Xcode Version 8.3+
- Swift 3.1+
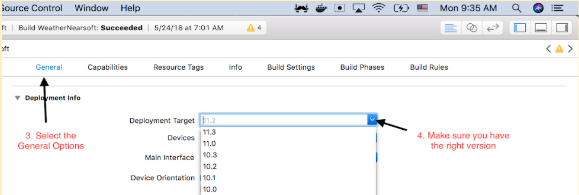
To check your iOS version, make sure you have selected the correct Deployment target. Start Xcode and follow the instructions below,
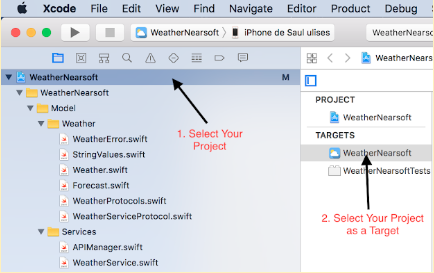
In your screen’s right panel, follow these instructions,
To check that you have the right version of Xcode, follow these instructions,
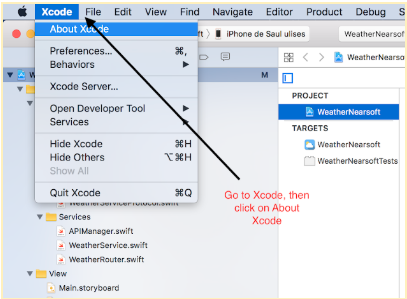
A new window will be displayed like this and you will be able to see your Xcode version,

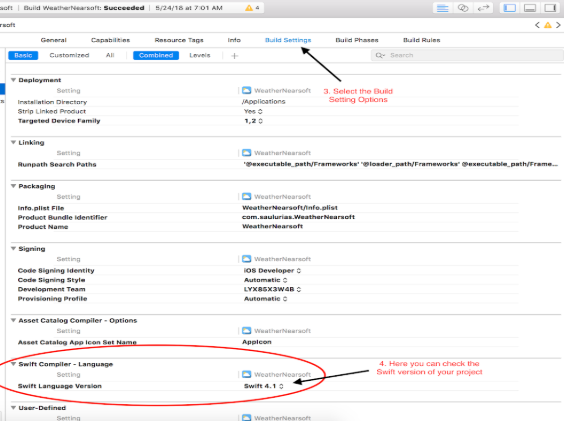
In order to find the Swift version of your project, follow these instructions,
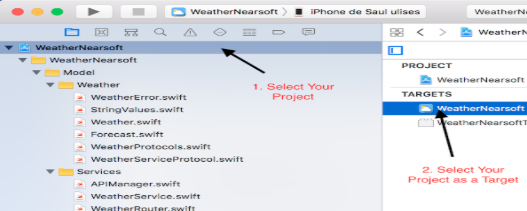
How to Install Alamofire?
There are several ways to do this,
- CocoaPods
- Carthage
- Swift Package Manager
- Manually.
CocoaPods
To integrate Alamofire into your Xcode project using CocoaPods, specify it in your Podfile,
target 'YourProjectName' do
  # Comment the next line if you're not using Swift and don't want to use dynamic frameworks
  use_frameworks!

  # Pods for YourProjectName
    pod 'Alamofire', '~> 4.7'
end
Carthage
You can also use Carthage to install Alamofire in your iOS project.
To integrate Alamofire into your Xcode project, specify it in your Cartfile,
github "Alamofire/Alamofire" ~> 4.7
Swift Package Manager
You can also Install Alamofire with Swift Package Manager.
For Swift 3, do this,
dependencies: [
    .Package(url: "https://github.com/Alamofire/Alamofire.git", majorVersion: 4)
]
For Swift 4, this,
dependencies: [
    .package(url: "https://github.com/Alamofire/Alamofire.git", from: "4.0.0")
]
Manual Install
If you prefer not to use any of the aforementioned dependency managers, you can integrate Alamofire into your project manually.
Doing a Request
Doing a request with Alamofire is as simple as,
Alamofire.request("https://yourApiUrl.com/get") //the default method is 'get'
Alamofire.request("https://yourApiUrl.com/post", method: .post)
Alamofire.request("https://yourApiUrl.com/put", method: .put)
Alamofire.request("https://yourApiUrl.com/delete", method: .delete)
Handling a Response
func getRequestWithAlamofire(){
    Alamofire.request("https://yourApiUrl.com/get").responseJSON { response in
      if let json = response.result.value {
          print("JSON: \(json)") // serialized json response
      }
   }
}
Note that this is a non-blocking function. In the above example you can see that Alamofire allows you to use a responseJSON handler appended to the request. Once the request is completed, you can use that handler to process the data. Instead of blocking execution, it returns right way.
Response Handlers
There are five different response methods that can be used with Alamofire requests,
-
response(Unserialized Response default handler)
func getRequestWithAlamofireHandlingDefaultResponse(){
  Alamofire.request("https://yourApiUrl.com/get").response { response in
     print(response)
  }
}
-
responseData(Serialized into Data to handle Data)
func getRequestWithAlamofireHandlingDataResponse(){
  Alamofire.request("https://yourApiUrl.com/get").responseData { response in
     print(response)
  }
}
-
responseString(Serialized into String to handle String)
func getRequestWithAlamofireHandlingStringResponse(){
  Alamofire.request("https://yourApiUrl.com/get").responseString { response in
     print(response)
  }
}
-
responseJson(Serialized into Any to handle JSON)func getRequestWithAlamofireHandlingJSONResponse(){
Alamofire.request("https://yourApiUrl.com/get").responseJSON { response in
print(response)
}
}responsePropertyList(Serialized into Any to handle PropertyList (plist))
func getRequestWithAlamofireHandlingPropertyListResponse(){
  Alamofire.request("https://yourApiUrl.com/get").responsePropertyList { response in
     print(response)
  }
}
Advantages of Using Alamofire
Using Alamofire you will have a cleaner project. API call interactions (POST/GET/PUT/etc.) will be easier and more understable.
Alamofire simplifies a number of common networking tasks that makes development faster and easier.
Disadvantages of Using Alamofire
The disadvantages are the same as using any other framework. For one, you now depend on a third-party for future support. For another, your requirements may change and the frameworks may stop being a good fit.
You must remember that Swift is updated frequently. If you need to update your project to the latest Swift version, you must wait until the framework is updated too.
Conclusion
Alamofire makes developing networking layers easier, faster and a lot cleaner. Another great benefit of using it is that you can study it and see how it’s written. That can help you to become a better programmer because it’s a well-written framework and you can learn a lot from it. I certainly did.
If you are getting into iOS development I would recommend to first create a project using URLSession. That’s the native way to work with networking connections in Swift and it will help you to understand how connections work. From that experience, you will understand all that Alamofire does for you.
There are other frameworks you can use for this, like SwiftHTTP, Swifter, Net, and many others. However, Alamofire has the best support. If you want to contribute to it you can follow their contributing guidelines.
If you have any questions you can contact us.